Tuesday, June 30, 2009

Indian Naan

One of my friends gave me this recipe not too long ago (Thanks, Amy!) and one night, we made this wonderful Indian thin bread (Naan) to go with Chicken Masala. The Naan isn't too hard to make, it just takes time and a little bit of patience. The pictures show not-so-perfectly-round-and-somewhat-ugly-shaped naan, but that's my fault. I wasn't patient enough to reshape the naan before I baked it. I was almost starved by the time I was about to bake it. But I am sure that yours will turn out a lot prettier than ours. The naan is soft and tastes so great!


Indian Naan

Ingredients:
  • 2/3 cup warm water (110 degrees F/45 degrees C)
  • 1 teaspoon active dry yeast
  • 1 teaspoon white sugar
  • 2 cups all-purpose flour
  • 1 teaspoon salt
  • 1/4 cup ghee
  • 2 tablespoons plain yogurt
  • 2 teaspoons kalonji (onion seed)
Direction:
  1. Whisk the warm water with the yeast and sugar until the yeast is dissolved. Cover and let stand in a warm place for 10 minutes.
  2. Sift flour and salt three times into a large bowl add the yeast mixture, half of the ghee and all the yogurt. Mix into a soft dough then knead on a floured surface for about 5 minutes or until dough is smooth and elastic. Place the dough in a large greased bowl, cover and let stand in a warm place for 1 1/2 hours or until the dough is doubled in size .
  3. Punch down dough then knead for 5 minutes. Divide dough into 6 pieces. Roll each piece out into 8 inch round naans.
  4. Cover an oven tray with foil and grease the foil. Brush the naan with a little of the remaining ghee and sprinkle with some of the kalonji. Cook naan one at a time under a very hot grill (I baked mine in the oven at 475 degrees F - Make sure to preheat the oven at least for 30 minutes prior to baking) for about 2 minutes on each side or until puffed and just browned.
Adapted from All recipes

Indian Naan

One of my friends gave me this recipe not too long ago (Thanks, Amy!) and one night, we made this wonderful Indian thin bread (Naan) to go with Chicken Masala. The Naan isn't too hard to make, it just takes time and a little bit of patience. The pictures show not-so-perfectly-round-and-somewhat-ugly-shaped naan, but that's my fault. I wasn't patient enough to reshape the naan before I baked it. I was almost starved by the time I was about to bake it. But I am sure that yours will turn out a lot prettier than ours. The naan is soft and tastes so great!


Indian Naan

Ingredients:
  • 2/3 cup warm water (110 degrees F/45 degrees C)
  • 1 teaspoon active dry yeast
  • 1 teaspoon white sugar
  • 2 cups all-purpose flour
  • 1 teaspoon salt
  • 1/4 cup ghee
  • 2 tablespoons plain yogurt
  • 2 teaspoons kalonji (onion seed)
Direction:
  1. Whisk the warm water with the yeast and sugar until the yeast is dissolved. Cover and let stand in a warm place for 10 minutes.
  2. Sift flour and salt three times into a large bowl add the yeast mixture, half of the ghee and all the yogurt. Mix into a soft dough then knead on a floured surface for about 5 minutes or until dough is smooth and elastic. Place the dough in a large greased bowl, cover and let stand in a warm place for 1 1/2 hours or until the dough is doubled in size .
  3. Punch down dough then knead for 5 minutes. Divide dough into 6 pieces. Roll each piece out into 8 inch round naans.
  4. Cover an oven tray with foil and grease the foil. Brush the naan with a little of the remaining ghee and sprinkle with some of the kalonji. Cook naan one at a time under a very hot grill (I baked mine in the oven at 475 degrees F - Make sure to preheat the oven at least for 30 minutes prior to baking) for about 2 minutes on each side or until puffed and just browned.
Adapted from All recipes

Indian Naan

One of my friends gave me this recipe not too long ago (Thanks, Amy!) and one night, we made this wonderful Indian thin bread (Naan) to go with Chicken Masala. The Naan isn't too hard to make, it just takes time and a little bit of patience. The pictures show not-so-perfectly-round-and-somewhat-ugly-shaped naan, but that's my fault. I wasn't patient enough to reshape the naan before I baked it. I was almost starved by the time I was about to bake it. But I am sure that yours will turn out a lot prettier than ours. The naan is soft and tastes so great!


Indian Naan

Ingredients:
  • 2/3 cup warm water (110 degrees F/45 degrees C)
  • 1 teaspoon active dry yeast
  • 1 teaspoon white sugar
  • 2 cups all-purpose flour
  • 1 teaspoon salt
  • 1/4 cup ghee
  • 2 tablespoons plain yogurt
  • 2 teaspoons kalonji (onion seed)
Direction:
  1. Whisk the warm water with the yeast and sugar until the yeast is dissolved. Cover and let stand in a warm place for 10 minutes.
  2. Sift flour and salt three times into a large bowl add the yeast mixture, half of the ghee and all the yogurt. Mix into a soft dough then knead on a floured surface for about 5 minutes or until dough is smooth and elastic. Place the dough in a large greased bowl, cover and let stand in a warm place for 1 1/2 hours or until the dough is doubled in size .
  3. Punch down dough then knead for 5 minutes. Divide dough into 6 pieces. Roll each piece out into 8 inch round naans.
  4. Cover an oven tray with foil and grease the foil. Brush the naan with a little of the remaining ghee and sprinkle with some of the kalonji. Cook naan one at a time under a very hot grill (I baked mine in the oven at 475 degrees F - Make sure to preheat the oven at least for 30 minutes prior to baking) for about 2 minutes on each side or until puffed and just browned.
Adapted from All recipes

Monday, June 29, 2009

Thai Red Curry

When I was pregnant with my baby boy, the only thing that I really craved in the first trimester was this - delicious, sweet, mildly hot Thai red curry (or green curry). I would've never thought I could make this at home... If I had known, I probably would've made it for every dinner when I was pregnant. Well, I guess, it's for the better. Otherwise, it would've taken me much longer to lose my baby weight, right? The best way to serve this dish is with jasmine rice. I can't imagine eating a Thai dish without flavorful jasmine rice. I love dipping the rice in the soup.... Mmmm.... Just thinking about it makes my mouth water...

Thai Red Curry

Ingredients:

Cooked Jasmine rice
2 tablespoons oil
2-3 tablespoons red curry paste (or more if you want it to be hotter. We used a whole bottle because we LOVE hot stuff!)
2-3 garlic cloves, minced
1 cup coconut milk
1 cup chicken stock
2 tablespoons fish sauce
1 tablespoon brown sugar
1/2 teaspoon salt
1 - 1/2 lb tritip beef (or flank steak), thinly sliced (You may replace it with chicken if desired)
2 tablespoons cornstarch + 1 tablespoon water
2 tablespoons lemon juice
4-6 large fresh min leaves (or basil leaves)

Vegetable- (A good thing about curry is that you can put whatever vegetables you like, really. You can use zucchinis, peas, squash, maybe even broccoli... but these are the vegetables we normally use and it was fantastic!)

1/2 acorn squash, peeled and cut into cubes
1 red bell pepper, seeded and sliced
1 yellow bell pepper, seeded and sliced
1 can bamboo shoots

Direction:

Heat the oil in a large saucepan over medium heat. Add garlic and the curry paste and cook, stirring, for a minute.

Add the coconut milk, chicken stock, fish sauce, sugar, and salt, then bring it to a boil.

Add the vegetables (squash, red and yellow bell pepper, bamboo shoots) and reduce the heat to medium and simmer for 12 minutes.

Add the beef and simmer, covered, for another 8-10 minutes or until the beef is cooked.

In a small bowl, mix the cornstarch and water together, then pour it into the curry, stirring frequently, until the curry thickens. Stir in the lemon juice and mint leaves.

Serve with/over rice.

Thai Red Curry

When I was pregnant with my baby boy, the only thing that I really craved in the first trimester was this - delicious, sweet, mildly hot Thai red curry (or green curry). I would've never thought I could make this at home... If I had known, I probably would've made it for every dinner when I was pregnant. Well, I guess, it's for the better. Otherwise, it would've taken me much longer to lose my baby weight, right? The best way to serve this dish is with jasmine rice. I can't imagine eating a Thai dish without flavorful jasmine rice. I love dipping the rice in the soup.... Mmmm.... Just thinking about it makes my mouth water...

Thai Red Curry

Ingredients:

Cooked Jasmine rice
2 tablespoons oil
2-3 tablespoons red curry paste (or more if you want it to be hotter. We used a whole bottle because we LOVE hot stuff!)
2-3 garlic cloves, minced
1 cup coconut milk
1 cup chicken stock
2 tablespoons fish sauce
1 tablespoon brown sugar
1/2 teaspoon salt
1 - 1/2 lb tritip beef (or flank steak), thinly sliced (You may replace it with chicken if desired)
2 tablespoons cornstarch + 1 tablespoon water
2 tablespoons lemon juice
4-6 large fresh min leaves (or basil leaves)

Vegetable- (A good thing about curry is that you can put whatever vegetables you like, really. You can use zucchinis, peas, squash, maybe even broccoli... but these are the vegetables we normally use and it was fantastic!)

1/2 acorn squash, peeled and cut into cubes
1 red bell pepper, seeded and sliced
1 yellow bell pepper, seeded and sliced
1 can bamboo shoots

Direction:

Heat the oil in a large saucepan over medium heat. Add garlic and the curry paste and cook, stirring, for a minute.

Add the coconut milk, chicken stock, fish sauce, sugar, and salt, then bring it to a boil.

Add the vegetables (squash, red and yellow bell pepper, bamboo shoots) and reduce the heat to medium and simmer for 12 minutes.

Add the beef and simmer, covered, for another 8-10 minutes or until the beef is cooked.

In a small bowl, mix the cornstarch and water together, then pour it into the curry, stirring frequently, until the curry thickens. Stir in the lemon juice and mint leaves.

Serve with/over rice.

Friday, June 26, 2009

Sweet Sesame Chicken

I am always in search of good Japanese recipes! I've been trying to find a great sesame chicken recipe as it is one of my favorite things to get whenever we go out to eat at a Japanese restaurant. Although the sauce was a little sweeter than I expected, this recipe was pretty good. When I was down at an oriental market a few weeks ago, I managed to buy a $11 Korean sesame oil (one of the best!!) so I used it for this recipe. Seriously, guys, you might think all sesame seed oil taste the same, but no, you must try sesame seed oil from Korea or Japan. They're seriously so good! If you're a big fan of sesame chicken, try this recipe.

Ingredients:

3 large boneless skinless chicken breasts, cut in half or in cubes
2 tablespoons raw or toasted sesame seeds (I used toasted sesame seeds)
2 green onions (sliced)

Marinade-
1 teaspoon chicken base or water
¼ teaspoon salt
½ teaspoon sesame oil
ground white pepper (to taste)
¼ teaspoon sugar
1 tablespoon red wine or mirin (I used both - 1/2 tablespoon red wine + 1/2 tablespoon mirin)

Batter-
½ cup all purpose flour
1 teaspoon baking powder
1 egg (beaten)
½ cup water (or as much as needed to make batter smooth)
3 tablespoons cornstarch
salt (to taste)
1 tablespoon vegetable oil

Sauce-
2 tablespoon soy sauce
3 tablespoons honey
2 tablespoons sugar
Salt (to taste)
1 1/2-2 tablespoons ketchup
1 tablespoon white distilled vinegar
a sprinkle of ground black pepper


Direction

In large bowl, combine all of the marinade ingredients and mix well. Add the chicken and coat evenly. Cover and marinade for 30 minutes in the refrigerator.

Meanwhile, in separate bowl, combine all of the batter ingredients and mix thoroughly. The batter should be thick enough to coat the chicken but thin enough to flow around the pieces. Set aside.

Using a fork or tongs remove the pieces of chicken from the marinade and dip them into the batter to coat evenly (one by one). Deep fry the chicken in batches in your deep fryer (or in deep frying pan in about 3 tablespoons oil, over high heat, about 3-4 minutes each side) for about 10 minutes or until golden brown. Drain on paper towels.

In sauce pan, add the sauce ingredients and warm over medium heat. Bring to a boil while stirring and simmer until sauce slightly thickens.

Pour the sauce over the chicken, and garnish the plate with sliced green onions and sesame seeds.

Slightly adapted from Blogchef

Wednesday, June 24, 2009

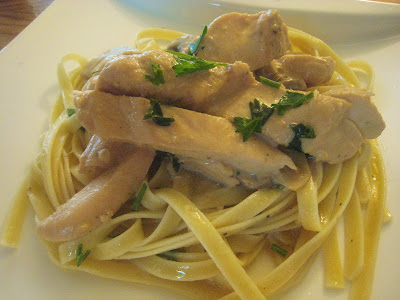
Chicken Marsala with Mustard and Mascarpone

I wanted to make something incredible for my husband's birthday and found this great recipe! The sauce mixture of marsala wine and mascarpone cheese makes this dish sweet, tangy, and creamy. Try it sometime if you want to impress your loved ones with a better-than-any-restaurants-quality food!!

Chicken Marsala

Ingredients:

1 1/2 lbs boneless, skinless chicken breast fillets
Salt and freshly gound black pepper
2 tablespoons olive oil
5 tablespoons unsalted butter
3/4 cup chopped onions (I didn't use any but it still turned out great!)
1 lb cremini mushrooms, trimmed and slice (I used regular brown mushrooms)
3 tablespoons minced garlic
1 cup dry marsala wine
1 cup (8 ounces) mascarpone cheese
2 tablespoons dijon mustard
2 tablespoons chopped fresh flat leaf parsley
12 ounces dried fettucine

Direction:

Sprinkle the chicken with salt and pepper. Heat the oil in a large skillet over high heat. Add the chicken and cook just until brown, about 4 minutes per side. Set aside.

(While the chicken cools, melt 2 tablespoons of the butter in the same skillet over medium high heat, then add the onions and saute until it is tender, about 2 minutes.)

Add the musrooms and garlic and saute until the mushrooms are tender and the juices evaporate, about 10-12 minutes. Add the wine and simmer until it is reduced by half, about 4 minutes. Stir in the mascarpone and mustard.

Cut the chicken breasts crosswise into 1/3 inch thick slices. Return the chicken to the skillet. Simmer uncovered over medium-low heat until the chicen is just cooked through and the sauce thickens slightly, about 2 minutes. Stir in 1 tablespoon of the parsley and season the sauce to taste with salt and pepper.

Bring a large pot of salted water to a boil. Add the fettuccine and cook, stirring occasionally, until al dante, about 8 minutes. Drain. Toss with the remaining 3 tablespoons of butter and 1 tablespoon of parsley. Season with salt and pepper. (Do not skip this part. The butter and pasley make the pasta taste so yummy!) Serve the marsala chicken over the fettuccine and enjoy!

Adapted from Giada de Laurentiis' recipe

Sunday, June 21, 2009

Korean Budae Jigae (Army Base Soup)

Okay, before you decide to skip this recipe because of its interesting combination of Korean and American ingredients, let me tell you how this wonderful soup dish came about. It all started in early 1950's, when Korean War broke. Many American soldiers were sent to Korea to fight. You can imagine how poor Koreans were at the time of the war. There were many people who were dying of hunger. As American soldiers were throwing away their leftover food, such as sausages, ham, baked beans, etc, many poor Koreans picked them up and threw them in their soup. A little sad to think that many of these poor people had to eat someone else's leftover food to survive, but the soup they created is definitely unbelievable. You might think sausages and ham shouldn't belong in soup, especially in Asian soup, but it is a very well known Korean food that everyone enjoys nowadays. My husband wasn't sure about it at first, either, but as soon as he tried a bite, he couldn't stop eating it. He even took some to lunch to work the next day.

Ingredients:

Soup Ingredients
  • 1 onion, sliced or diced
  • 3 bulbs of green onion, chopped
  • 2 zucchinis, halved and sliced
  • 1 jalapeno pepper, sliced (If you don't handle the spice very well, I'd skip it.)
  • 6 tablespoons of baked beans/pork and beans
  • 3 Frank sausages, sliced
  • 1 small can of spam, sliced
  • firm tofu, halved and sliced
  • 2/3 cup of well fermented kimchi (You will find one at any local grocery stores, usually the same place you'll find tofu)
  • 1 can of chicken broth
  • 1 can of beef broth
  • 1 uncooked ramen

    Paste for the Soup

  • 2 tablespoons of soy sauce
  • 4 cloves garlic minced
  • 2 tablespoons of korean red pepper flakes (or 1-2 tablespoons red crushed pepper)
  • salt and pepper
Direction:
In large, deep saute pan (preferably an electric one, so you can cook it over at your table), place all the soup ingredients, except chicken broth, beef broth, and ramen. In small bowl, combine all the ingredients for the soup paste and mix well. Place the soup paste in the middle of all the other soup ingredients in the saute pan.

Turn the heat to medium high and pour in the chicken broth and the beef broth to the pan. Bring it to a boil.
When the soup boils, place the uncooked ramen in the soup and stir until it is cooked. Serve with rice.

Slightly adapted from Tasty Meals at Home

Thursday, June 18, 2009

Indian Chili Chicken

Oh my... I would've never thought homemade Indian dish could be this good!! It's definitely one of my favorite Indian dishes I've tried! The fresh chilies and chili powder go very well together and it gives such a fiery taste! You can either serve the dish over naan or rice, and I highly recommend jasmine rice. The juice from the dish mixed with the rice was probably my favorite thing about the dish.

Indian Chili Chicken

Ingredients:

6-8 large red chillies
4 tablespoon corn or sunflower seed oil (I used olive oil, instead)
2 onions, chopped (I only used a quarter of an onion due to my husband's dislike of onions)
1 teaspoon chili powder
1 teaspoon grated fresh gingerroot
2 garlic cloves, finely chopped
1/2 teaspoon cumin seeds
2 curry leaves (I didn't use any)
pinch of salt
3 large chicken breasts, boneless, skinless, cut into cubes
2 tablespoons chopped fresh cilantro
1 tablespoon lime juice
2-4 tomatoes, cut into quarters
Naan bread or Jasmine rice

Direction:

Make a slit along the side of each chili. Heat the oil in a large skillet over low heat. Add the chillies and cook, turning occasionally, for 4-5 minutes, or until beginning to color. Remove with slotted spoon and set aside.

Add onions, chili powder, ginger, garlic, cumin seeds, curry leaves, ad salt to the skillet and cook over medium heat, stirring for 2-3 minutes. Add the chicken and cook, stirring frequently, for 8-10 minutes, or until tender and cooked through.

Stir in the cilantro and lime juice, then return the chillies to skillet and add the tomatoes. Stir and heat briefly, then serve immediately with naan bread or jasmine rice.

Adapted from Ethnic Cuisine

Indian Chili Chicken

Oh my... I would've never thought homemade Indian dish could be this good!! It's definitely one of my favorite Indian dishes I've tried! The fresh chilies and chili powder go very well together and it gives such a fiery taste! You can either serve the dish over naan or rice, and I highly recommend jasmine rice. The juice from the dish mixed with the rice was probably my favorite thing about the dish.

Indian Chili Chicken

Ingredients:

6-8 large red chillies
4 tablespoon corn or sunflower seed oil (I used olive oil, instead)
2 onions, chopped (I only used a quarter of an onion due to my husband's dislike of onions)
1 teaspoon chili powder
1 teaspoon grated fresh gingerroot
2 garlic cloves, finely chopped
1/2 teaspoon cumin seeds
2 curry leaves (I didn't use any)
pinch of salt
3 large chicken breasts, boneless, skinless, cut into cubes
2 tablespoons chopped fresh cilantro
1 tablespoon lime juice
2-4 tomatoes, cut into quarters
Naan bread or Jasmine rice

Direction:

Make a slit along the side of each chili. Heat the oil in a large skillet over low heat. Add the chillies and cook, turning occasionally, for 4-5 minutes, or until beginning to color. Remove with slotted spoon and set aside.

Add onions, chili powder, ginger, garlic, cumin seeds, curry leaves, ad salt to the skillet and cook over medium heat, stirring for 2-3 minutes. Add the chicken and cook, stirring frequently, for 8-10 minutes, or until tender and cooked through.

Stir in the cilantro and lime juice, then return the chillies to skillet and add the tomatoes. Stir and heat briefly, then serve immediately with naan bread or jasmine rice.

Adapted from Ethnic Cuisine

Monday, June 15, 2009

Rocky Road Dream Bars

Mmmm..... Just looking at the picture makes my mouth water.... Really, I am drooling all over my laptop... I made a slight change to our family's very favorite chocolate bar recipe and this wonderful, chewy, caramel filled rocky road dream bar was created. Whenever there is a special event, my husband asks me to make dream bars (it really is his favoritest thing in the world - sometimes I wonder if I come in second??) but due to its high calorie, I usually refuse. But since it was my husband's birthday (Happy Birthday, Mr. Seanjon!!), I decided to make this treat with a slight change to the recipe. Mr. Seanjon absolutely LOVED it! The marshmellows inside gave it a chewy texture and the crushed almonds on top was beyond amazing!! Oh and the caramel inside the bars.... Wow!! You have to try this for your special someone. You will have to be careful, though, because that special someone is most likely to be addicted to this treat and he/she will ask you to make it again every weekend. :)

Rocky Road Dream Bars

Ingredients:

Bars-
1/2 cup packed brown sugar
1/3 cup butter or margarine, softened
1 cup all-purpose flour
2 eggs
1 cup packed brown sugar
1 teaspoon vanilla
2 tablespoons all-purpose flour
1 teaspoon baking powder
1/2 teaspoon salt
2 cups milk chocolate chips (or 1 cup semisweet chocolate chips and 1 cup milk chocolate - this may be better for you if you don't want it to be super sweet! Me and my husband... well, we enjoy supersweet... maybe a little too much!)
6-8 large white marshmellows, cut in half
1/3 cup whole almonds, crushed

Chocolate glaze- (double this recipe to get enough for drizzling in the end)
3/4 cup milk chocolate chips
2 teaspoons vegetable oil

Direction:

Heat oven to 350 degrees F. In medium bowl, mix 1/2 cup brown sugar and the butter. Stir in 1 cup flour. Press in ungreased rectangular pan, 13X9X2 inches. Bake 10 minutes. Space marshmallows evenly on top of the crust about 1/4 apart.

In medium bowl, mix eggs, 1 cup brown sugar and the vanilla. Stir in 2 tablespoons flour, the baking powder and salt. Stir in milk chocolate chips. Spread over crust and marshmallows.

Bake bars 15 to 20 minutes or until golden brown. Cool completely in pan on wire rack. (Or toss it in the refrigerator about 30 minutes or so.)

In 1-quart saucepan, heat all Chocolate Glaze ingredients over low heat, stirring constantly, until chocolate is melted. (I wouldn't leave the stove if I were you. Just be patient and stay with the chocolate mixture. It should be melted in about a minute. Oh and make sure to double the glaze recipe.)

Pour half of the glaze on top of the cooled bar evenly. (Spread the glaze evenly with a spatula if needed.) Sprinkle almonds all over the bar. Drizzle rest of the glaze over almonds. Refrigerate at least 1 hour until firm. Cut bars and store at room temperature.

Yummy!! Enjoy!!

Rocky Road Dream Bars

Mmmm..... Just looking at the picture makes my mouth water.... Really, I am drooling all over my laptop... I made a slight change to our family's very favorite chocolate bar recipe and this wonderful, chewy, caramel filled rocky road dream bar was created. Whenever there is a special event, my husband asks me to make dream bars (it really is his favoritest thing in the world - sometimes I wonder if I come in second??) but due to its high calorie, I usually refuse. But since it was my husband's birthday (Happy Birthday, Mr. Seanjon!!), I decided to make this treat with a slight change to the recipe. Mr. Seanjon absolutely LOVED it! The marshmellows inside gave it a chewy texture and the crushed almonds on top was beyond amazing!! Oh and the caramel inside the bars.... Wow!! You have to try this for your special someone. You will have to be careful, though, because that special someone is most likely to be addicted to this treat and he/she will ask you to make it again every weekend. :)

Rocky Road Dream Bars

Ingredients:

Bars-
1/2 cup packed brown sugar
1/3 cup butter or margarine, softened
1 cup all-purpose flour
2 eggs
1 cup packed brown sugar
1 teaspoon vanilla
2 tablespoons all-purpose flour
1 teaspoon baking powder
1/2 teaspoon salt
2 cups milk chocolate chips (or 1 cup semisweet chocolate chips and 1 cup milk chocolate - this may be better for you if you don't want it to be super sweet! Me and my husband... well, we enjoy supersweet... maybe a little too much!)
6-8 large white marshmellows, cut in half
1/3 cup whole almonds, crushed

Chocolate glaze- (double this recipe to get enough for drizzling in the end)
3/4 cup milk chocolate chips
2 teaspoons vegetable oil

Direction:

Heat oven to 350 degrees F. In medium bowl, mix 1/2 cup brown sugar and the butter. Stir in 1 cup flour. Press in ungreased rectangular pan, 13X9X2 inches. Bake 10 minutes. Space marshmallows evenly on top of the crust about 1/4 apart.

In medium bowl, mix eggs, 1 cup brown sugar and the vanilla. Stir in 2 tablespoons flour, the baking powder and salt. Stir in milk chocolate chips. Spread over crust and marshmallows.

Bake bars 15 to 20 minutes or until golden brown. Cool completely in pan on wire rack. (Or toss it in the refrigerator about 30 minutes or so.)

In 1-quart saucepan, heat all Chocolate Glaze ingredients over low heat, stirring constantly, until chocolate is melted. (I wouldn't leave the stove if I were you. Just be patient and stay with the chocolate mixture. It should be melted in about a minute. Oh and make sure to double the glaze recipe.)

Pour half of the glaze on top of the cooled bar evenly. (Spread the glaze evenly with a spatula if needed.) Sprinkle almonds all over the bar. Drizzle rest of the glaze over almonds. Refrigerate at least 1 hour until firm. Cut bars and store at room temperature.

Yummy!! Enjoy!!

Friday, June 12, 2009

French Bread

I finally made a French bread. I was looking for a low calorie bread recipe, then found this one. Only 70 calories per slice which is way better than most bread. The bread was tasty, with the texture that French bread should have. It takes some time but is definitely worth the time.

French Bread

Ingredients:

3-3 1/2 cups all purpose flour
1 tablespoon sugar
1 teaspoon salt
1 package regular or quick active dry yeast (2 1/4 teaspoons)
1 cup very warm water (120-140 degrees F)
2 tablespoons vegetable oil
Cornmeal
1 egg white
1 tablespoon cold water
Poppy seed or sesame seed

Direction:
1. In large bowl, mix 2 cups of the flour, the sugar, salt, and yeast. Add warm water and oil. Beat with electric mixer on low speed 1 minute, scraping bowl frequently. Stir in enough remaning flour, 1/2 cup at a time, to make dough easy to handle.

2. On lightly floured surface, knead dough about 5 minutes or until smooth and elastic. Spray large bowl with cooking spray. Grease large bowl with shortening or spray with cooking spray. Place dough in bowl, turning dough to grease all sides. Cover and let rise in warm place 1 hour 30 minutes to 2 hours, or until dough has doubled in size. (Rising time is longer than times for traditional breads, which gives the typical French bread texture.) Dough is ready if indentation remains when touched.

3. Grease large cookie sheet with shortening or spray with cooking spray. Sprinkle with cornmeal. Gently push fist into dough to deflate. Divide in half. On lightly floured surface, roll each half into 15 X 8 inch rectangle. Roll dough up tightly, beginning at 15 inch side, to form a loaf. Pinch edge of dough into roll to seal. Roll gently back and forth to taper ends. Place both loaves on cookie sheet.

4. Cut 1/4 inch deep slashes across tops of loaves at 2 inch intervals with sharp knife. Brush loaves with cold water. Let rise uncovered in warm place about 1 hour or until dough has doubled in size.

5. Heat oven to 375 degrees F. In small bowl, mix egg white and 1 tablespoon cold water. Brush over loaves. Sprinkle with poppy or sesame seed. Bake 25-30 minutes or until loaves are golden brown and sound hollow when tapped. Remove from cookie sheet to wire rack. Cool.

Adapted from Betty Crocker

French Bread

I finally made a French bread. I was looking for a low calorie bread recipe, then found this one. Only 70 calories per slice which is way better than most bread. The bread was tasty, with the texture that French bread should have. It takes some time but is definitely worth the time.

French Bread

Ingredients:

3-3 1/2 cups all purpose flour
1 tablespoon sugar
1 teaspoon salt
1 package regular or quick active dry yeast (2 1/4 teaspoons)
1 cup very warm water (120-140 degrees F)
2 tablespoons vegetable oil
Cornmeal
1 egg white
1 tablespoon cold water
Poppy seed or sesame seed

Direction:
1. In large bowl, mix 2 cups of the flour, the sugar, salt, and yeast. Add warm water and oil. Beat with electric mixer on low speed 1 minute, scraping bowl frequently. Stir in enough remaning flour, 1/2 cup at a time, to make dough easy to handle.

2. On lightly floured surface, knead dough about 5 minutes or until smooth and elastic. Spray large bowl with cooking spray. Grease large bowl with shortening or spray with cooking spray. Place dough in bowl, turning dough to grease all sides. Cover and let rise in warm place 1 hour 30 minutes to 2 hours, or until dough has doubled in size. (Rising time is longer than times for traditional breads, which gives the typical French bread texture.) Dough is ready if indentation remains when touched.

3. Grease large cookie sheet with shortening or spray with cooking spray. Sprinkle with cornmeal. Gently push fist into dough to deflate. Divide in half. On lightly floured surface, roll each half into 15 X 8 inch rectangle. Roll dough up tightly, beginning at 15 inch side, to form a loaf. Pinch edge of dough into roll to seal. Roll gently back and forth to taper ends. Place both loaves on cookie sheet.

4. Cut 1/4 inch deep slashes across tops of loaves at 2 inch intervals with sharp knife. Brush loaves with cold water. Let rise uncovered in warm place about 1 hour or until dough has doubled in size.

5. Heat oven to 375 degrees F. In small bowl, mix egg white and 1 tablespoon cold water. Brush over loaves. Sprinkle with poppy or sesame seed. Bake 25-30 minutes or until loaves are golden brown and sound hollow when tapped. Remove from cookie sheet to wire rack. Cool.

Adapted from Betty Crocker