Showing posts with label Kimchi. Show all posts

Tuesday, February 9, 2010

Kimchi Buchimgae (Korean Kimchi Pancakes) & Award


Kimchi Buchimgae is one of my favorite Korean snacks ever! My mom used to make these on rainy days or when it was cold out. It is incredibly easy to fix but tastes wonderful. If you have homemade kimchi, wait until it is about 2 weeks old so that it's texture would be nice and soft when it is cooked. You can add other vegetables if you want to, like zucchini or bell peppers but I like mine plain with some kimchi and chili peppers.

Kimchi Buchimgae

Ingredients:

1 cup kimchi, chopped
1 cup flour or Korean buchimgae flour (You can find it at oriental stores)
1 cup water (You may add less water for a thicker texture. I like light texture with more water but you can add about 2/3 cup water.)
1/4 cup kimchi juice (the juice from the kimchi container)
1 serano chili pepper, sliced (you can seed it or use the seeds for spicier buchimgae)
1/4 teaspoon salt


Directions:

In a large bowl, combine kimchi, flour, water, kimchi juice, chili pepper, and salt and mix well with a spoon, until the flour is not lumpy.

Heat oil (about 1 tablespoon) on a flat pan over medium-high heat, add about 1/2 cup full mixture on to the pan and cook about 1-2 minutes on each side or until the pancakes are reddish brown.

Serve with soy sauce if desired.

Enjoy!

I'd like to thank Devi's Blog for giving me this nice award! I'm always happy to get these awards. Let me introduce you to 7 blogs I love to visit. 
Once Upon a Plate
Sweet Water
Angie's Recipes
Priya's Easy N Tasty Recipes
Vazhayila
Blog Chef
Zen Kimchi Korean Food Journal

Wednesday, January 27, 2010

How to make Kimchi 김치


Well, it's finally here! The Kimchi recipe! I've been trying to make Kimchi on my own for a while now. I thought I'd never be able to.

Koreans judge one's cooking skill by how delicious her or his kimchi is. People say kimchi is a hard one to master and they might be right because it took me a while to make a perfect kimchi that I just love! Once it was too bland. Once it was too salty. Once I didn't have enough fillings. The list goes on.

Then this time, I made it just the way I like it. It doesn't mean you will love it, too, though as people like Kimchi differently. I like mine spicy. But if you can't handle the spice very well, you can always add less pepper flakes than I did. Also, I don't really care for "fishy" kimchi. Normally, Koreans add shrimp chunks to it but I don't like it. So I added 1 tablespoon of fish sauce. But if you want to add fine shrimp chunks to it, go ahead. No problem. But this recipe is how I like it. I couldn't find any Korean daicons around so I used 2 Japanese daicons. They taste pretty much the same to me. The difference between Korean and Japanese daicons is the shape. Korean ones are short and fat and Japanese ones are long and skinny. The daicon filling is one of my favorite things about Kimchi. It gives such a great and unique flavor to Kimchi. Okay, enough said about Kimchi. I know a lot of you have been waiting for this recipe. So here is it. Enjoy!

Korean Kimchi

Ingredients:

2 nappa cabbages. washed
Very coarse salt  for Kimchi (*You can find this salt at any Korean stores or oriental market. The salt is very coarse and it drains the water out of the cabbages)

Filling
2 Korean or Japanese daicons, washed and peeled
10 garlic cloves, minced
1 tablespoon fish sauce
15-20 tablespoons Korean red pepper flakes for Kimchi (Now you can definitely add less or more according to your liking.)
4 green onions, finely chopped
2 tablespoons ginger, finely chopped
2 tablespoons sugar
1 1/2 cup warm water

Directions:


Cut the nappa cabbage in half lengthwise as shown in the picture above. In a very large bowl, sprinkle coarse salt on each layer of the cabbage thoroughly (You will need at least about a handful of salt for each half-cabbage.) Cover the bowl and set aside, about 5-6 hours. I, personally like my kimchi a little bit crunchy at first, but if you want yours to be softer in the beginning, you may let it stand a while longer.

Now, the filling-


Cut diacons in half about 3 inches long.


Slice the daicon thinly lengthwise and cut into thin strips as shown in the picture above. Put it in a large bowl.


Add the rest of the filling ingredients into the bowl and mix with your hand thoroughly until all the daicon strips are covered in red. Set aside about 1 hour. There will be water in the bowl from the daicon. Mix well again with your hand until the water is soaked into the mixture.


Wash the cabbages thoroughly with water and squeeze it to drain extra water from the cabbages.


Fill each layer of the cabbage with a handful of the filling.


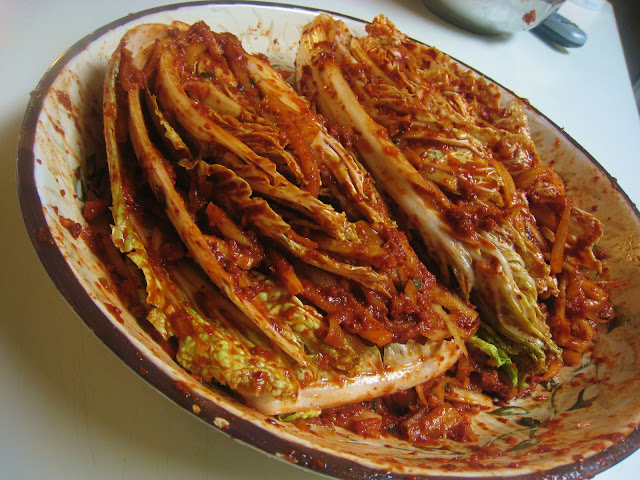
When you're done, they should look like this. The filling should cover all the white parts of the cabbage. Let stand about 1 hour in room temperature.


Transfer the kimchi to large and deep containers. Seal and refrigerate. The kimchi will be ready to be eaten in 3-4 days. The juices of the cabbage come out and make the kimchi taste wonderful. Sometimes I eat it right away but it is definitely a lot crunchier in the beginning.


Slice the kimchi about 2 inches wide.


Enjoy!!

Tuesday, January 19, 2010

나박김치 Na-bak-kimchi (Cold White Kimchi Soup)


I'd been craving Na-bak-kimchi so much that I had to get all the ingredients to make this very authentic and tasty white kimchi soup. It is a very refreshing cold kimchi soup that calls for lots of different kinds of vegetables, such as nappa cabbage, cucumbers, carrots, apples, pears, daicons, etc. I love the crunchiness of this dish. It's a popular dish in Korea during Summer. But I really like it all year round. Keep it in the fridge and it lasts for a long time. As time goes on, it tastes even better, just like many other kinds of kimchi. Oh and the apples and the pears were seriously my favorite ingredients in this kimchi! So delicious and refreshing!


나박김치 Na-bak-kimchi
Printable Recipe

Ingredients:

1/2 daicon (Japanese or Korean), washed, peeled and sliced
1 heart of nappa cabbage, washed and sliced in bite sizes
1 tablespoons coarse sea salt
1 apple, peeled and cored, sliced in bite sizes
1 pear, peeled and cored, sliced in bite sizes
1 tablespoons sugar
1 carrot, peeled and sliced
1 cucumber, sliced in half-moons
2 green onions, cut in 2-inch pieces
2 tablespoons salt
Water

Sauce-
6 garlic cloves, minced
1 tablespoon ginger, minced
3 tablespoons Korean red chili pepper flakes
1-2 tablespoons water

Directions:


In a large bowl, combine the sliced cabbage and daicon and sprinkle the coarse sea salt. Mix them together and set aside, about 20-25 minutes.


Meanwhile, in a medium bowl, combine the apple and pear slices and sprinkle sugar and mix them together. Add the sugared apple and pear slices, cucumber, carrots, and green onions to the cabbage and daicon mixture.


Sprinkle 2 tablespoons salt over the mixture and pour water into the bowl just to cover all the vegetables.


To make sauce, mix all the sauce ingredients in a small bowl and mix them all together until it makes a nice, thick paste.


Pour the sauce into the vegetable and water mixture and stir well. Store it in room temperature overnight and refrigerate about a day or two. *You may add more salt or red chili pepper flakes according to your liking.