Sunday, January 31, 2010

Chicken, Bok Choy and Black Beans Stir-fry

Happy Sunday everyone! First of all, I'd like to thank everyone who wished me a Happy Birthday. I had a great birthday. My husband made me an omelet for breakfast and he cleaned up the kitchen for me. Oh and he made me a birthday cake (chocolate mousse cake: YUM!), too. Isn't he so sweet? I love him.

So - I'm not feeling so good today. I have a cold or something. My nose is stuffy and my head hurts a little. But I decided to sit on my couch and post this wonderful recipe real quick. Thank goodness, you can't catch cold through internet. So feel safe to read along. :)

This is a great recipe that calls for my new favorite, bok choy. Whenever I see a recipe that calls for bok choy, I bookmark it. I hadn't really tried anything with bok choy until recently, though. I just never knew what to make with it. Bok choy is great warm. It's excellent in stir-fried food. And it's healthy! The addition of water chestnut and black beans is also what makes this dish so unique and wonderful.

Chicken, Bok Choy and Black Bean Stir-Fry
Printable Recipe

Ingredients:

1 lb chicken breasts
1 canned black beans, drained (about 1 1/2 cup)
1 lb baby bok choy
1 onion, finely sliced (optional)
2-4 cloves garlic, finely chopped
2-3 teaspoons chopped ginger
1 red bell pepper, cut into strips
1/2 cup canned water chestnuts, drained
1 tablespoon soy sauce
1/2-1 teaspoon fish sauce

Directions:

1. Slice the chicken into strips, cutting across the grain. Cut the ends off the bok choy, separate the leaves and shred.

2. Heat half the sesame oil in a large non-stick frying pan or wok. Cook the onions, garlic and ginger over high heat for 3-4 minutes, add the bell pepper and cook for 2-3 minutes. Remve fro the pan. Heat the remaining sesame oil and stir fry the chicken in batches over high heat.

3. Return all the chicken to the pan along with the onion mixture, black bans, shredded bok choy, water chestnuts, and fish sauce. Toss quickly to combine the ingredients, lower the heat and cover and steam for 3-4 minutes, or until the bok choy has just wilted. Serve immediately.


Thursday, January 28, 2010

Chocolate Chip Pecan Brownie Cake

The weekend is here! I'll be celebrating my birthday this weekend. I'm not sure what we'll do but hopefully something fun. What is your plan for the weekend?

I made these brownies last weekend and it was fabulous! I'll admit. I am not a huge fan of brownies, at least the really heavy and thick kind... I do like moist and almost cake-like brownies. Like this one. I added about 2 tablespoons of milk to the batter and it turned out so moist but still rich in flavor. This one is packed with my favorite ingredients; such as chocolate chips and pecans! You can replace the pecans with walnuts, if you'd like. My husband is allergic to walnuts. But the nuts and chocolate chips gave these brownies such a great texture and yummy flavor. I would definitely make it again. My husband loved it so much that he rejected my idea of taking the leftovers to his work for everyone. Apparently he didn't like the idea of sharing it with other people. :)

Chocolate Chip Pecan Brownie Cake
Printable Recipe

Ingredients: 

1/4 cup butter
6 tablespoons cocoa powder
1 cup white sugar
1/4 teaspoon salt
1/2 cup flour
2 teaspoon vanilla extract
2 eggs
2/3 cup chocolate chips
1/3 cup pecans or walnuts
2 tablespoons milk

Directions:

Preheat oven to 300 degrees F. Grease an 8-inch round cake pan.

Melt the butter over low heat. Pour into large mixing bowl and stir in cocoa powder, sugar, salt, flour, and vanilla. Mix in eggs, chocolate chips, pecans, and milk. Spread the dough evenly into the cake pan.

Bake for 30 minutes. Let cool in pan for 10-15 minutes before cutting.


Chocolate Chip Pecan Brownie Cake

The weekend is here! I'll be celebrating my birthday this weekend. I'm not sure what we'll do but hopefully something fun. What is your plan for the weekend?

I made these brownies last weekend and it was fabulous! I'll admit. I am not a huge fan of brownies, at least the really heavy and thick kind... I do like moist and almost cake-like brownies. Like this one. I added about 2 tablespoons of milk to the batter and it turned out so moist but still rich in flavor. This one is packed with my favorite ingredients; such as chocolate chips and pecans! You can replace the pecans with walnuts, if you'd like. My husband is allergic to walnuts. But the nuts and chocolate chips gave these brownies such a great texture and yummy flavor. I would definitely make it again. My husband loved it so much that he rejected my idea of taking the leftovers to his work for everyone. Apparently he didn't like the idea of sharing it with other people. :)

Chocolate Chip Pecan Brownie Cake
Printable Recipe

Ingredients: 

1/4 cup butter
6 tablespoons cocoa powder
1 cup white sugar
1/4 teaspoon salt
1/2 cup flour
2 teaspoon vanilla extract
2 eggs
2/3 cup chocolate chips
1/3 cup pecans or walnuts
2 tablespoons milk

Directions:

Preheat oven to 300 degrees F. Grease an 8-inch round cake pan.

Melt the butter over low heat. Pour into large mixing bowl and stir in cocoa powder, sugar, salt, flour, and vanilla. Mix in eggs, chocolate chips, pecans, and milk. Spread the dough evenly into the cake pan.

Bake for 30 minutes. Let cool in pan for 10-15 minutes before cutting.


Wednesday, January 27, 2010

How to make Kimchi 김치


Well, it's finally here! The Kimchi recipe! I've been trying to make Kimchi on my own for a while now. I thought I'd never be able to.

Koreans judge one's cooking skill by how delicious her or his kimchi is. People say kimchi is a hard one to master and they might be right because it took me a while to make a perfect kimchi that I just love! Once it was too bland. Once it was too salty. Once I didn't have enough fillings. The list goes on.

Then this time, I made it just the way I like it. It doesn't mean you will love it, too, though as people like Kimchi differently. I like mine spicy. But if you can't handle the spice very well, you can always add less pepper flakes than I did. Also, I don't really care for "fishy" kimchi. Normally, Koreans add shrimp chunks to it but I don't like it. So I added 1 tablespoon of fish sauce. But if you want to add fine shrimp chunks to it, go ahead. No problem. But this recipe is how I like it. I couldn't find any Korean daicons around so I used 2 Japanese daicons. They taste pretty much the same to me. The difference between Korean and Japanese daicons is the shape. Korean ones are short and fat and Japanese ones are long and skinny. The daicon filling is one of my favorite things about Kimchi. It gives such a great and unique flavor to Kimchi. Okay, enough said about Kimchi. I know a lot of you have been waiting for this recipe. So here is it. Enjoy!

Korean Kimchi

Ingredients:

2 nappa cabbages. washed
Very coarse salt  for Kimchi (*You can find this salt at any Korean stores or oriental market. The salt is very coarse and it drains the water out of the cabbages)

Filling
2 Korean or Japanese daicons, washed and peeled
10 garlic cloves, minced
1 tablespoon fish sauce
15-20 tablespoons Korean red pepper flakes for Kimchi (Now you can definitely add less or more according to your liking.)
4 green onions, finely chopped
2 tablespoons ginger, finely chopped
2 tablespoons sugar
1 1/2 cup warm water

Directions:


Cut the nappa cabbage in half lengthwise as shown in the picture above. In a very large bowl, sprinkle coarse salt on each layer of the cabbage thoroughly (You will need at least about a handful of salt for each half-cabbage.) Cover the bowl and set aside, about 5-6 hours. I, personally like my kimchi a little bit crunchy at first, but if you want yours to be softer in the beginning, you may let it stand a while longer.

Now, the filling-


Cut diacons in half about 3 inches long.


Slice the daicon thinly lengthwise and cut into thin strips as shown in the picture above. Put it in a large bowl.


Add the rest of the filling ingredients into the bowl and mix with your hand thoroughly until all the daicon strips are covered in red. Set aside about 1 hour. There will be water in the bowl from the daicon. Mix well again with your hand until the water is soaked into the mixture.


Wash the cabbages thoroughly with water and squeeze it to drain extra water from the cabbages.


Fill each layer of the cabbage with a handful of the filling.


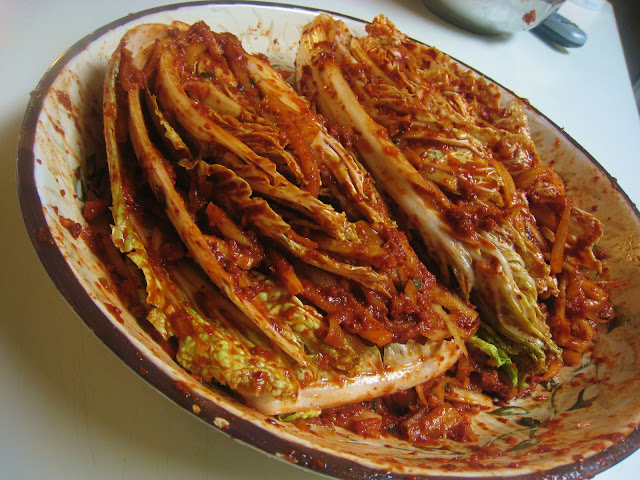
When you're done, they should look like this. The filling should cover all the white parts of the cabbage. Let stand about 1 hour in room temperature.


Transfer the kimchi to large and deep containers. Seal and refrigerate. The kimchi will be ready to be eaten in 3-4 days. The juices of the cabbage come out and make the kimchi taste wonderful. Sometimes I eat it right away but it is definitely a lot crunchier in the beginning.


Slice the kimchi about 2 inches wide.


Enjoy!!